express入门
本文最后更新于:2020年12月24日 下午
express入门
写在前面
众所周知,node.js使得JavaScript从前端老大哥变成了前后端都能用的开发神器(利用native-react,js也可以做出真实app了)。而具体在开发中,js怎么实现后端们的工作咧,这就要用到express框架(当然也有很多其他的框架,比如koa)
照例搬上express的中文官网
这里面的npm都可以且建议换成cnpm,如果你配置了淘宝镜像的话。当然你想要配置淘宝镜像的话点击这里
用npm开始
npm i express-cli --save顺便说一个npm脚手架开发的基本流程
首先创建一个装项目的文件夹
mkdir myapp进到里面去
cd myapp初始化脚手架
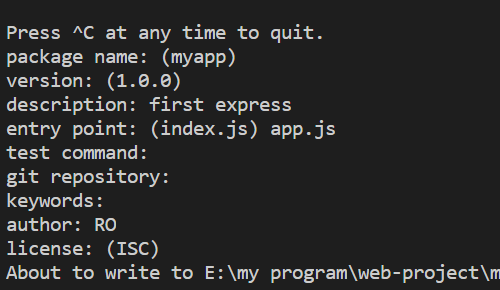
npm init进行一系列的选项选择

然后它会把这个信息写到文件夹下的package.json文件中
写入基本的代码
// app.js
var express = require('express');
var app = express();

app.get('/', function(req, res){
    res.send("hello world!");
});

app.listen(3000, function(){
    console.log('The example app is listening on port 3000!');
});
然后你通过用node运行这个app.js文件,就可以在本地创建一个服务器了
接着你可以通过localhost:3000来访问这个本地服务器,可以看到web页面中出现了hello world字样
继续科普npm
你其实可以修改package.json文件的内容(它并不是只保存了依赖项等信息来npm install),这样你可以自定义一些指令
eg:我这里express项目生成的package.json文件如下
{
  "name": "express-test",
  "version": "1.0.0",
  "description": "",
  "main": "app.js",
  "scripts": {
    "test": "echo \"Error: no test specified\" && exit 1"
  },
  "author": "",
  "license": "ISC",
  "dependencies": {
    "express-cli": "^0.0.1"
  }
}scripts中的数据就是可以用指令执行的快捷命令,你不妨把scripts中的test进行一下修改(其实是直接删了):
"scripts": {
	"start": "node app.js"
}
这样我们就不用每次敲node来执行,而是用npm start就能执行了(好像没怎么方便啊)
Express应用生成器
在我们做项目开发的时候只是自己写express的代码开发效率肯定是不高的(就像我们做vue项目时用vue-cli一样),于是我们就要借助于生成器express-generator。
Get Start
npm install express-generator -g这里为啥要用-g呢,其实就是以免以后的项目中要用到生成器,方便快速生成。
express --view=ejs blog这里的view=ejs意思是模板引擎是用的ejs(views中的文件)
通过npm start就可以打开我们的项目了
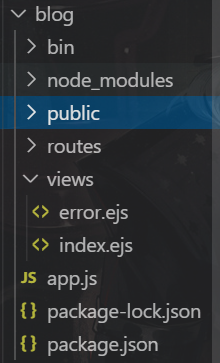
然后说一下我们的文件结构:

bin里面装的是www(其实还是写的是js代码)
router中的index.js长啥样:
var express = require('express');
var router = express.Router();

/* GET home page. */
router.get('/', function(req, res, next) {
  res.render('index', { title: 'Express' });
});

module.exports = router;
这里的res.render渲染的就是index模块(views中的index.ejs),然后它指定title这个属性名的属性值是Express,index.ejs中的title都会被渲染成Express
安装nodemon
因为我们每次进行像上面的title值的修改都必须要重启node服务才会看到web网页内容的改变,这极为不方便,于是就有了nodemon
npm i nodemon -s然后我们去package.json修改start
"scripts": {
    "start": "nodemon ./bin/www"
},
于是就实现了类似热加载的功能

Express各种方法讲解
首先我们再次看一看开头写过的
app.js文件代码
// app.js
var express = require('express');
var app = express();

app.get('/', function(req, res){
    res.send("hello world!");
});

app.listen(3000, function(){
    console.log('The example app is listening on port 3000!');
});
第二行是
require引用就不多说了express()是express上的顶级方法,作用是create一个express实例,于是我们利用这一点来创建了一个叫app的express实例第五行利用实例对象上的
get方法来创建服务器上的一个路由(相应的就有post等方法),这个方法的第二个参数是一个函数(传参分别是请求对象和响应对象),请求和响应上又有诸多的方法,比如这个上面的就是一个send方法,传送HTTP响应。拓展一波:
res.sendFile(path,[,options][,fn])又是一个可以传送文件的方法。然后express对象上的
listen方法就是用来定义端口的,它监听我们定义好的端口,然后在此端口上建立服务器连接。第二个参数是最开始建立连接时在控制台打印的信息。
静态文件的使用
Express提供了内置的中间件express.static(你问我中间件是啥,我也不知道,反正感觉和api很像)来设置静态文件。
eg:
// 比如你有一个图片在public文件夹下
app.use('/public', express.static('public'));这样你就可以通过/public这个路由来查看你每一个public文件夹下的静态文件。
比如你想要看public下的logo.png,路由到/public/logo.png即可(当然,你也可以把路由定为/myrouter,就是可以自定义路由名)
get方法详解
我们暂时通过一个栗子来看看
<!-- index.html -->
<html>

<body>
    <form action="http://127.0.0.1:3000/process_get" method="GET">
        First Name: <input type="text" name="first_name"> <br>

        Last Name: <input type="text" name="last_name">
        <input type="submit" value="Submit">
    </form>
</body>

</html>
// app.js
const express = require('express')
const app = express();
const port = 3000;
app.use('/', express.static('images'));
app.get('/', function(req, res){
res.send('Hello World!');
})
app.get('/index.html', function(req, res){
res.sendFile(__dirname + "/" + 'index.html');
})
app.get('/process_get', function(req, res){
var response = {
"first_name":req.query.first_name,
"last_name":req.query.last_name
};
console.log(response);
res.send(JSON.stringify(response));
})
app.listen(port, ()=>{
console.log('the app is listening to the port 3000');
})在这里我们通过res.sendFile()方法将index.html文件传送到了路由为/index.html的页面中,然后通过form表单的跳转功能将数据传入到了/process_get中(json格式)
post方法详解
<!-- index.html -->
<html>

<body>
    <form action="http://127.0.0.1:3000/process_post" method="POST">
        First Name: <input type="text" name="first_name"> <br>

        Last Name: <input type="text" name="last_name">
        <input type="submit" value="Submit">
    </form>
</body>

</html>
// app.js
var express = require('express');
var app = express();
const port = 3000;
var bodyParser = require('body-parser');
// 创建 application/x-www-form-urlencoded 编码解析
var urlencodedParser = bodyParser.urlencoded({ extended: false })
app.use('/public', express.static('public'));
app.get('/index.html', function (req, res) {
res.sendFile( __dirname + "/" + "index.html" );
})
app.post('/process_post', urlencodedParser, function (req, res) {
// 输出 JSON 格式
var response = {
"first_name":req.body.first_name,
"last_name":req.body.last_name
};
console.log(response);
res.end(JSON.stringify(response));
})
app.listen(port, ()=>{
console.log('the app is listening to the port 3000');
})拓展bodyParser
这里又出现了一个常用的中间件
bodyParser,这个是用来对post请求的请求体进行解析。使用非常简单,一般用以下两行代码:
app.use(bodyParser.json());
app.use(bodyParse.urlencoded({ extended: false }));
入门基础
这里得讲几个基础知识,比如post请求的报文格式。
POST /test HTTP/1.1
Host: 127.0.0.1:3000
Content-Type: text/plain; charset=utf8
Content-Encoding: gzip

chyingp其中需要我们注意的有Content-Type、Content-Encoding以及报文主体:
- Content-Type:请求报文主体的类型、编码。常见的类型有
text/plain、application/json、application/x-www-form-urlencoded。常见的编码有utf8、gbk等。 - Content-Encoding:声明报文主体的压缩格式,常见的取值有
gzip、deflate、identity。 - 报文主体:这里是个普通的文本字符串
chyingp。
本博客所有文章除特别声明外,均采用 CC BY-SA 4.0 协议 ,转载请注明出处!