Flutter入门
本文最后更新于:2023年3月6日 下午
Flutter踩坑记录
Flutter框架模版
import 'package:flutter/material.dart';
void main() => runApp(MyApp());
// ignore: use_key_in_widget_constructors
class MyApp extends StatelessWidget {
Widget build(BuildContext context) {
return MaterialApp(
// 定义app的名字
title: 'RO\'s App',
// 定义主题
theme: ThemeData(primarySwatch: Colors.blue),
// 主页组件
home: MyHomePage(),
);
}
}
// ignore: use_key_in_widget_constructors
class MyHomePage extends StatefulWidget {
_MyHomePageState createState() => _MyHomePageState();
}
// 只有在State组件中才能实现状态
class _MyHomePageState extends State<MyHomePage> {
Widget build(BuildContext context) {
// 在主页中返回脚手架
return Scaffold(
// 定义bar
appBar: AppBar(
title: const Text('Welcome to My App')
),
// 写主页的主体内容
body: const Center(
child: Text(
'Hello World!',
// 设置字体样式
style: TextStyle(fontSize: 30.0, fontWeight: FontWeight.bold),
)
),
);
}
}开始
在第一次使用VScode开发Flutter时,创建一个模板时选择了一个命名方式为
FirstApp的项目,这实际上是不可行的(命名必须要以小写字母命名并用下划线连接)


Hello World!
在flutter里面,应用的入口文件是
/lib/main.dart,所以我们在这个文件里面写上入门的Hello World!
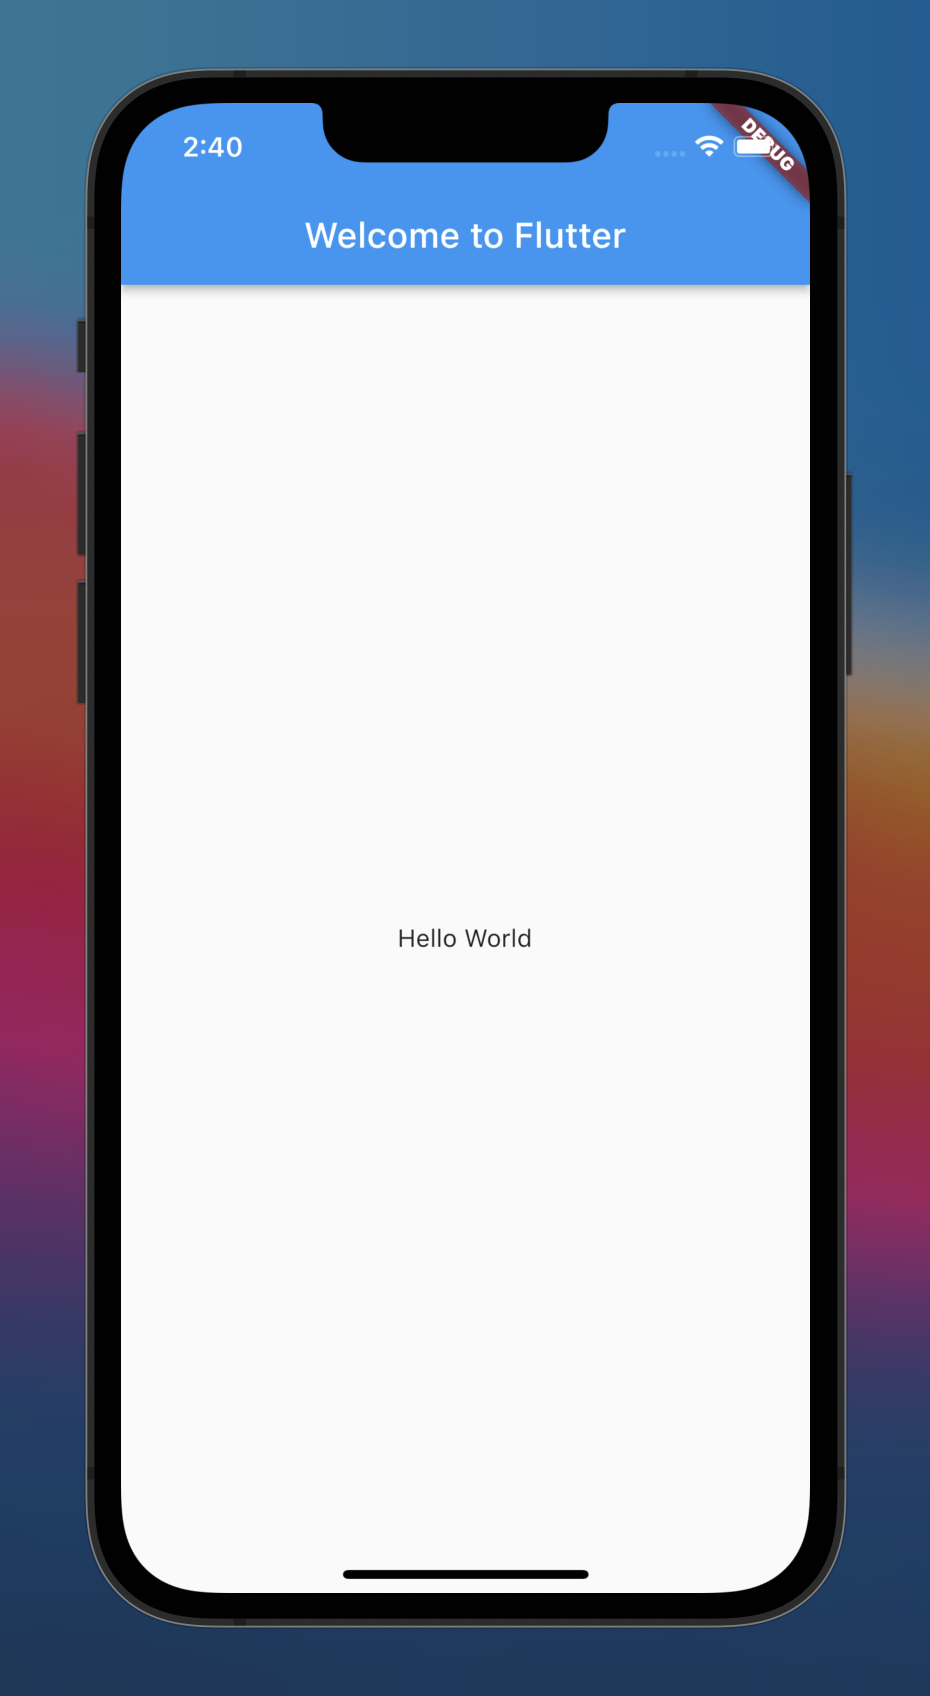
下面是官网上贴上的入门代码:
import 'package:flutter/material.dart';
void main() => runApp(new MyApp());
class MyApp extends StatelessWidget {
Widget build(BuildContext context) {
return new MaterialApp(
title: 'Welcome to Flutter',
home: new Scaffold(
appBar: new AppBar(
title: new Text('Welcome to Flutter'),
),
body: new Center(
child: new Text('Hello World'),
),
),
);
}
}效果如下:

入门代码分析
该应用程序继承了 StatelessWidget,这将会使应用本身也成为一个widget。 在Flutter中,大多数东西都是widget,包括对齐(alignment)、填充(padding)和布局(layout)
在MyApp这个类里面,我们重写了build这个方法,传递的是一个创建上写文(
BuildContext)widget的主要工作是提供一个build()方法来描述如何根据其他较低级别的widget来显示自己。
本示例代码中的body的widget树中包含了一个Center widget, Center widget又包含一个 Text 子widget。 Center widget可以将其子widget树对其到屏幕中心。
引入第三方库
- 在
pubspec.yaml中引入第三方的english_words:
dependencies:
  flutter:
    sdk: flutter

  cupertino_icons: ^0.1.0
english_words: ^3.1.0- 在
main.dart中导包:
import 'package:english_words/english_words.dart';然后在MyApp中写上我们的第三方库的新功能:
class MyApp extends StatelessWidget {
Widget build(BuildContext context) {
final wordPair = new WordPair.random();
return new MaterialApp(
title: 'Welcome to Flutter',
home: new Scaffold(
appBar: new AppBar(
title: new Text('Welcome to Flutter'),
),
body: new Center(
//child: new Text('Hello World'),
child: new Text(wordPair.asPascalCase),
),
),
);
}
}Problem
但是运行之后在控制台里面我们很容易得到报错信息:
Error: Cannot run with sound null safety, because the following dependencies
don't support null safety:
这是因为最新版本的flutter sdk更为严格了,必须使用支持safety模式的包(咱们的english_words就是一个不支持safety模式的包)
我们可以在vscode设置中添加上flutter启动时的args,以此来忽略safety的检查。

添加有状态的部件
import 'package:flutter/material.dart';
// ignore: import_of_legacy_library_into_null_safe
import 'package:english_words/english_words.dart';
void main() => runApp(new MyApp());
class MyApp extends StatelessWidget {
Widget build(BuildContext context) {
return new MaterialApp(
title: 'Welcome to Flutter',
home: new Scaffold(
appBar: new AppBar(
title: new Text('Welcome to Flutter'),
),
body: new Center(
child: new RandomWords(),
),
),
);
}
}
class RandomWords extends StatefulWidget {
createState() => new RandomWordsState();
}
class RandomWordsState extends State<RandomWords> {
Widget build(BuildContext context) {
final wordPair = new WordPair.random();
return new Text(wordPair.asPascalCase);
}
}Stateless widgets 是不可变的, 这意味着它们的属性不能改变 - 所有的值都是最终的.
Stateful widgets 持有的状态可能在widget生命周期中发生变化. 实现一个 stateful widget 至少需要两个类:
实际上我们其实将我们的随机单词显示封装成了一个类,而这个类又是一个有状态的部件
Dart
在看到
dart语言的时候,你会觉得dart就像是java和JavaScript的结合体,事实上也确实是这样你需要记住的是dart语言是一个强类型语言
Flutter Widget学习
我们写组件(widget)的过程其实就是一直在为组件传参数的过程,比如我们在写Text组件时,我们传入的第一个参数就是文字的内容(一个字符串); 同时我们传递参数的参数值就是一个个枚举值
一个较复杂的案例
import 'package:flutter/material.dart';
// 定义商品类
class Product {
final String title;
final String description;
Product(this.title, this.description);
}
void main() => runApp(MyApp());
// 主应用类
// ignore: use_key_in_widget_constructors
class MyApp extends StatelessWidget {
Widget build(BuildContext context) {
return MaterialApp(
title: 'Ro\'s App',
theme: ThemeData(primarySwatch: Colors.blue),
home: MyHomePage(),
);
}
}
// ignore: use_key_in_widget_constructors
class MyHomePage extends StatefulWidget {
final List<Product> products = List.generate(20, (index) => Product('商品 $index', 'This is really good!'));
_MyHomePageState createState() => _MyHomePageState(products: products);
}
// 主页组件
class _MyHomePageState extends State {
final List<Product> products;
_MyHomePageState({required this.products});
Widget build(BuildContext context) {
return Scaffold(
appBar: AppBar(
title: const Text('导航页面')
),
body: Center(
child: ListView.builder(
itemCount: products.length,
itemBuilder: (context, index) {
return ListTile(
leading: const Icon(Icons.local_grocery_store_rounded, size: 30,),
title: Text(products[index].title),
subtitle: Text(products[index].description),
trailing: ElevatedButton(
child: const Text('Buy it!'),
style: ButtonStyle(
fixedSize: MaterialStateProperty.all(const Size(80, 35))
),
onPressed: () {
Navigator.push(context, MaterialPageRoute(
builder: (context) => CommodDetail(product: products[index])
)
);
},
)
);
},
)
),
);
}
}
// 商品详情页组件
// ignore: use_key_in_widget_constructors
class CommodDetail extends StatelessWidget {
final Product product;
// ignore: prefer_const_constructors_in_immutables
CommodDetail({Key? key, required this.product}) : super(key: key);
Widget build(BuildContext context) {
return Scaffold(
appBar: AppBar(
title: Text(product.title),
),
body: Center(
child: Text(product.description),
),
);
}
}Flutter动画
Animation
本身只是一个抽象类,UI渲染没有任何关系。
主要用来保存动作信息和监听事件
Curve
用来决定动画过程是匀速还是加速等等
主要由
CurvedAnimation来指定动画的Curve事例代码:
final CurvedAnimation curve =
  CurvedAnimation(parent: controller, curve: Curves.easeIn);
AnimationController
用来控制动画,包括持续时间,启动,停止,反向播放等
Tween
控制AnimationController的范围
lerp
Flutter 中给有可能会做动画的一些状态属性都定义了静态的 lerp 方法(线性插值),比如:
//a 为起始颜色,b为终止颜色,t为当前动画的进度[0,1]
Color.lerp(a, b, t);
动画详解
- 首先放入大框架:
import 'package:flutter/material.dart';
void main() => runApp(MyApp());
// ignore: use_key_in_widget_constructors
class MyApp extends StatelessWidget {
Widget build(BuildContext context) {
return MaterialApp(
title: 'RO\'s App',
theme: ThemeData(primarySwatch: Colors.pink),
home: ScaleAnimationRoute()
);
}
}建立一个
ScaleAnimationRoute的有状态的组件这个组件中主要放入动画的动画效果(animation)和控制器(controller):
// ignore: use_key_in_widget_constructors class ScaleAnimationRoute extends StatefulWidget { _ScaleAnimationRouteState createState() => _ScaleAnimationRouteState(); } class _ScaleAnimationRouteState extends State<ScaleAnimationRoute> // 多继承自Ticker,以便之后的controller使用 with SingleTickerProviderStateMixin { // 首先定义Animation和AnimationController late Animation<double> animation; late AnimationController controller; initState() { super.initState(); // 设置控制器的值 controller = AnimationController( // 设置持续时间 duration: const Duration(seconds: 2), // 传入ticker vsync: this ); //使用弹性曲线 animation = CurvedAnimation(parent: controller, curve: Curves.bounceIn); // 匀速 // 设置动画,图片的宽高从0变到300 animation = Tween(begin: 0.0, end: 300.0).animate(controller); // 正向启动动画 controller.forward(); } Widget build(BuildContext context) { return GrowTransition( child: Image.network("https://s2.loli.net/2022/03/26/jEHDFtp3uUwofQr.png"), animation: animation, ); }可以看到我们定义这个①动画的值大小从0到300,②使用bounceIn方式过渡,③这个动画的持续时间为2秒
创建动画放生的组件实体(主要包含通用的组件实体,这个组件就是一个封装好的组件效果实体):
class GrowTransition extends StatelessWidget { const GrowTransition({ Key? key, required this.animation, this.child }) : super(key: key); final Widget? child; final Animation<double> animation; Widget build(BuildContext context) { return Center( child: AnimatedBuilder( animation: animation, builder: (BuildContext context, child) { return SizedBox( height: animation.value, width: animation.value, child: child, ); }, child: child, ), ); } }这里的child是从
_ScaleAnimationRouteState拿到的动画,然后通过AnimatedBuilder挂载到目标组件上,目标组件在_ScaleAnimationRouteState中两次使用child:第一次是将外部的组件引入,然后
animatedBuilder会构造出我们特定的组件,最后将此组件放到child中(第二次child)
本博客所有文章除特别声明外,均采用 CC BY-SA 4.0 协议 ,转载请注明出处!