Flutter开发技巧
本文最后更新于:2023年3月6日 下午
Flutter开发技巧
首先是必知必会模版
import 'package:flutter/material.dart';
void main() {
runApp(MyApp());
}
// ignore: use_key_in_widget_constructors
class MyApp extends StatelessWidget {
Widget build(BuildContext context) {
return MaterialApp(
title: 'Ro\'s App',
theme: ThemeData(primarySwatch: Colors.blue),
home: MyHomePage(),
);
}
}
// ignore: use_key_in_widget_constructors
class MyHomePage extends StatefulWidget {
_MyHomePageState createState() => _MyHomePageState();
}
class _MyHomePageState extends State<MyHomePage> {
Widget build(BuildContext context) {
return Scaffold(
appBar: AppBar(
title: const Text('Welcome to My App')
),
body: const Center(
child: Text(
'Hello World!',
style: TextStyle(
fontSize: 30,
fontWeight: FontWeight.bold
),
),
),
);
}
}这个组件我应该怎么写?
我们都知道,写flutter的过程就是调用不同的构造函数的过程,实现不同的样式和功能则是在构造器中传入了不同的参数。很多时候,我们需要做的就是不断地向构造器中传入参数
但是我们不知道有哪些参数怎么办?
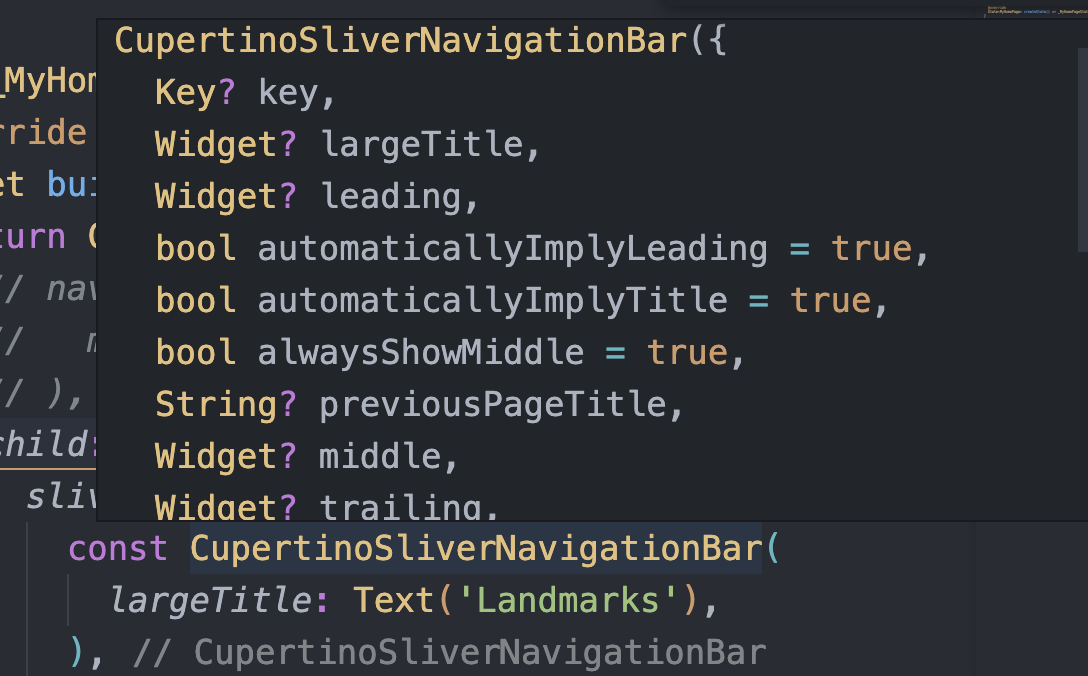
请善用你的IDE,以我的VS code为例,你可以将鼠标移动到某个组件的构造器上(对于dart来说就是一个类),然后你就可以看到这个构造器的所有参数名和类型,像这样:

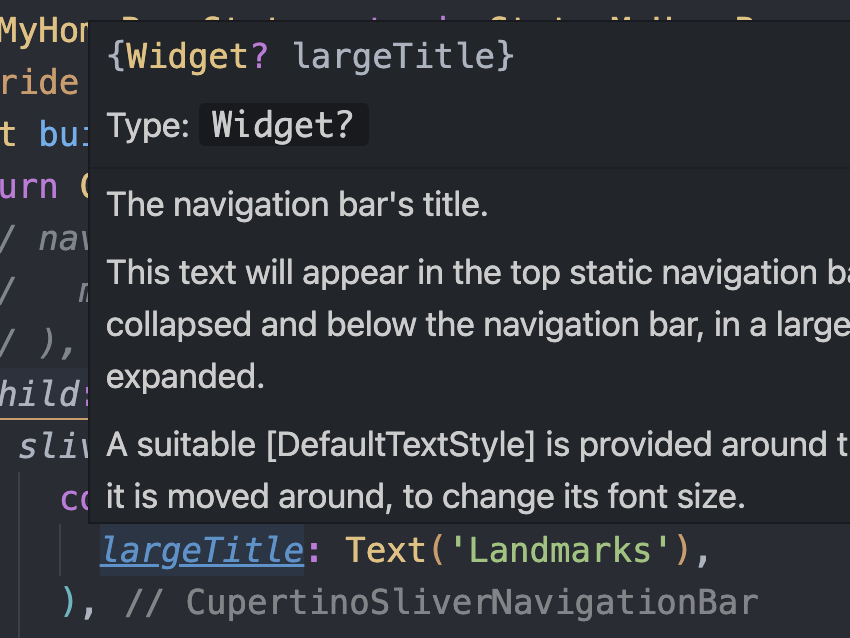
同理,你可以将鼠标移动到哪个参数上,这样你就知道该参数的类型(90%以上又是一个类),这时候你就可以直接写出另一个构造器当作传参了,就像这样:

你要是英语没问题,基本上就可以慢慢写(tui ce)出来了
我的HTML盒子呢?
很多前端童鞋开始上手flutter(比如说我),看到这种“后端形式的样式布局”,不知道如何下手,自己熟悉的盒子模型变成了一个个构造器,那么到底怎么用盒子的思维布局呢?
1. 盒子就是Container
当你使用到Container这个组件时,你会感到熟悉感,它拥有width和height。没错,很大程度上Container就是用来当作盒子(容器)的
这里直接给到一个案例吧,懂得都懂
Container(
  width: 300,
  height: 300,
  margin: const EdgeInsets.all(20),
  padding: const EdgeInsets.all(30),
  decoration: BoxDecoration(
    border: Border.all(color: Colors.black45, width: 3),
    borderRadius: const BorderRadius.all(Radius.circular(30)),
    color: Colors.blue
  ),
  child: Text(_text),
)
需要解释一下:
margin, padding:
是我们前端理解的那个没错,但是都是一种EdgInset类型(边界值)
decoration:
所有的样式改变都在这个下面,一般是一个BoxDecoration类型(毕竟是“盒子”嘛),专门来设置比如背景颜色(color),边框(border)等
SizedBox
如果你只想设置一个“盒子”的大小,采用SizedBox比较方便也更为合理
2. 文字样式
首先所有的文字都是使用
Text组件进行构造的,在Text组件的参数中,有一个属性叫做style,专门用来管理文字样式
Text(
  'Hello world',
  style: TextStyle(
    fontSize: 30,
    fontWeight: FontWeight.bold
  )
)
踩坑记录
CupertinoPageScaffold
这是Cupertino的页面框架组件,对应于Material的Scaffold。如果你使用navigationBar并且正继续填补child参数,你会发现,你写的组件都不见了(如果wrap上Center可能还可以看见),这是因为Cupertino的Scaffold实现没有把navigationBar作为页面组件填充到页面中,而是作为一个浮动的组件浮空在页面上部分,所以你的child组件是被navigationBar挡住而看不见的。
解决办法:通常情况下需要在child中包裹一层SafeArea,这样就可以自动适配系统布局,你的child就会被“挤到”navigationBar下面了(于是也就看得见了)
更多信息参看官方组件说明
SingleSliver
这并不是什么flutter的内置组件名,而是我对于一个需求的描述。
很多时候,我们可能用到CustomScrollView来合并两个不同的Sliver组件,有时候我们想在两个Sliver组件中加上一个单独的组件,这样这个SingleSliver就可以跟着它上下两个组件一起无缝滚动了。但问题在于,flutter的内置Sliver组件基本上都是List或者是包含多个组件的集合体,怎么才能将一个单独的组件变为Sliver呢?
解决方法:使用SliverToBoxAdapter这个内置组件
Scaffold(
  body: CustomScrollView(
    slivers: <Widget>[
      SliverToBoxAdapter(
        child: Container(
          child: Text('This is a single widget'),
        ),
      )
    ],
  ),
);
第三方库使用记录
1. http
首先展示一下http的官方案例:
import 'package:http/http.dart' as http;

var url = Uri.parse('https://example.com/whatsit/create');
var response = await http.post(url, body: {'name': 'doodle', 'color': 'blue'});
print('Response status: ${response.statusCode}');
print('Response body: ${response.body}');

print(await http.read(Uri.parse('https://example.com/foobar.txt')));
获取数据的思路是:
使用flutter原生的Uri类型解析一个url
异步方式使用http的post(应该也可以get)发送请求,返回的类型是一个
Future<Response>可以直接用
response.body得到请求数据的字符串
一般数据请求并渲染步骤:
ElevatedButton(
  onPressed: () async {
    var url = Uri.parse('http://39.98.122.169:8888/tags/hot/4');
    var response = await http.get(url);
    var res = jsonDecode(utf8.decode(response.bodyBytes));
    setState(() {
      _text = res['data'][0]['id'].toString();
    });
  },
  child: const Text(
    'click me'
  )
)
解析url并发送get请求
获取到的
Future<Response>解码为dart的dynamic对象因为dart是强类型语言,所以不能使用res.data的方式获取属性,而使用res[‘data’]这种方式
本博客所有文章除特别声明外,均采用 CC BY-SA 4.0 协议 ,转载请注明出处!